一个很清晰的架构实践,同时刨刨MySQL的坑。
一、洋葱架构简介
洋葱架构出来的其实有一点年头了。大约在2017年下半年,就有相关的说法了。不过,大量的文章在于理论性的讨论,而我们今天会用一个项目来完成这个架构。
洋葱架构,有时候也被叫做整洁架构,它本身是为高质量的软件而存在的。
相对其它架构而言,洋葱架构具有更好的可测试性、实用性和稳定性,并且足够灵活,完全适应项目未来可能的成长和进化。可以这么说,洋葱架构完美解决了三层或N层架构所面临的困难和问题。
牛吹完了,下面来看张图:
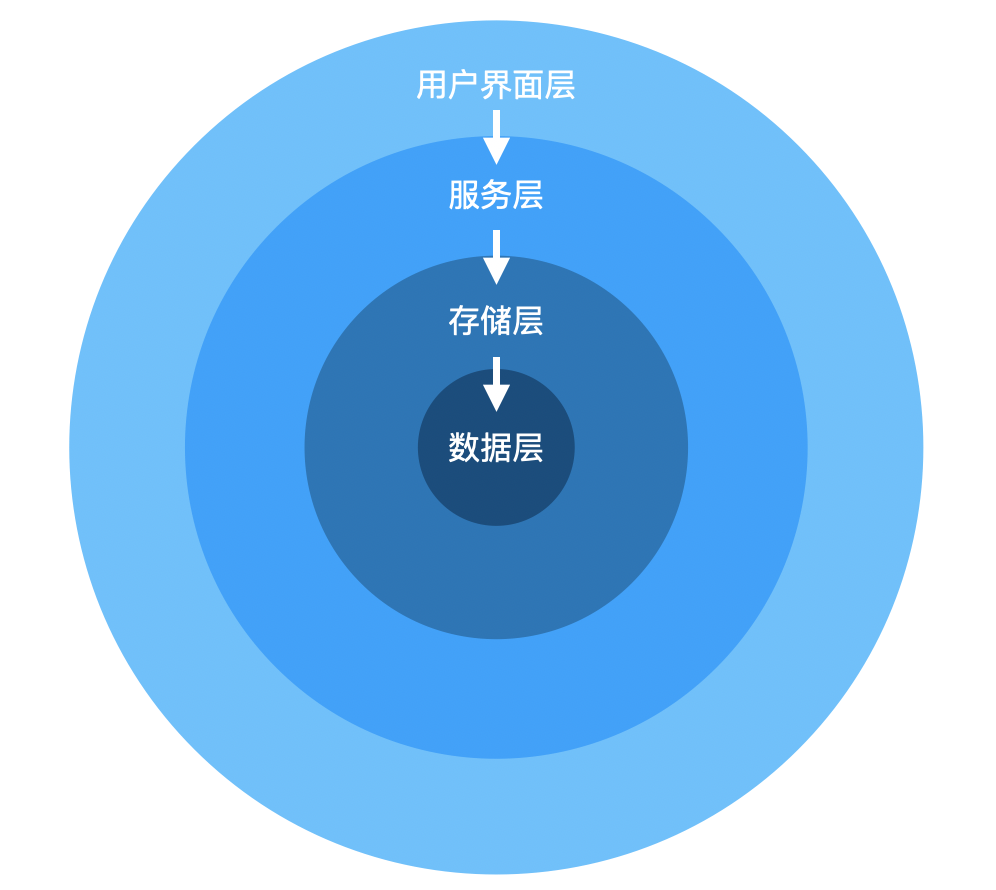
这张图,充分解释了它为什么叫洋葱架构。
不过,这不是重点。这个架构最重要的是里面的代码依赖原则:从外向内,并且只有这一个方向。处于内环的代码,不应该知道外环的任何东西。
从上面图也可以看到,洋葱架构,也使用层的概念。不过,它不同于我们习惯的三层或N层。我们来看看每个层的情况:
- 数据层(Domain Layer)
存在于架构的中心部分,由所有业务数据的实体组成。大多数情况下,就是我们的数据模型。后面的实践代码中,我是用EF(Entity Framework)来操作的数据库。
- 存储层(Repository Layer)
存储层在架构中充当服务层和数据模型之间的纽带,并且在这一层将保持所有数据库操作和应用数据的上下文。通常的做法是接口,用接口来描述数据访问所涉及的读写操作。
- 服务层(Services Layer)
服务层用于实现存储层和项目之间的通信,同时,还可以保存实体的业务逻辑。在这一层,服务接口与实现分离,以实现解耦和焦点分离。
- 用户界面层(UI Layer)
这个不解释了。项目最终对外的一层。注意,这儿可能是网站,也可能是API。不需要纠结有没有实际的界面。咱们的实践代码中,我用的是API。
为了防止不提供原网址的转载,特在这里加上原文链接:https://www.cnblogs.com/tiger-wang/p/14547702.html
二、实践
好,现在直接进入代码。
1. 创建工程
这个不解释了,都是套路:
% dotnet new webapi -o demo -f netcoreapp3.1我这个工程用的是Dotnet Core 3.1。框架不重要,基本上哪个版本都可以用。
下面设置Swagger
这个是我的习惯,而且这个项目是个WebApi,装个Swagger方便。
% dotnet add package swashbuckle.aspnetcoreSwagger的设置不是本文的重点,略过。需要的同学可以去看源代码。
下面,我们在工程中建三个目录:
- DomainLayer
- RepositoryLayer
- ServicesLayer
这三个目录对应上面的三个层。UI在这个项目里其实就是控制器Controller,已经存在了。
建这三个目录的目的,是为了放置三个层的代码。后面编码的时候,你会看到这三个层之间的关系。另外,这三个层在实际应用时,可以独立为三个类库,这样会更清晰。
前边说了,我会用EF操作数据库。所以,这儿还需要引入三个库:
% dotnet add package Microsoft.EntityFrameworkCore% dotnet add package Microsoft.EntityFrameworkCore.Relational% dotnet add package Pomelo.EntityFrameworkCore.MySql注意,微软的EF框架没有提供MySQL的接入,所以引用了一个三方的库。
至此,项目的准备工作完成。
2. 实现数据层
在DomainLayer目录里,建一个Models目录。在Models目录下,建两个类:
BaseEntity.cs
public class BaseEntity{ public int Id { get; set; } public DateTime CreatedDate { get; set; } public DateTime ModifiedDate { get; set; } public bool IsActive { get; set; }}Customer.cs
public class Customer : BaseEntity{ public string CustomerName { get; set; } public string PurchasesProduct { get; set; } public string PaymentType { get; set; }}两个类,Customer派生自BaseEntity。没什么特殊的含义,也是一个习惯。而且,后面到存储层写着方便。
后面,我们会用到Customer和BaseEntity实体类创建的数据表。为了让大家看的明白,我在这儿建一个目录EntityMapper,在目录里写个表结构映射。
CustomerMap.cs
public class CustomerMap : IEntityTypeConfiguration<Customer>{ public void Configure(EntityTypeBuilder<Customer> builder) { builder.HasKey(x => x.Id) .HasName("pk_customerid"); builder.Property(x => x.Id).ValueGeneratedOnAdd() .HasColumnName("id") .HasColumnType("INT"); builder.Property(x => x.CustomerName) .HasColumnName("customer_name") .HasColumnType("NVARCHAR(100)"); builder.Property(x => x.PurchasesProduct) .HasColumnName("purchased_product") .HasColumnType("NVARCHAR(100)") .IsRequired(); builder.Property(x => x.PaymentType) .HasColumnName("payment_type") .HasColumnType("NVARCHAR(50)") .IsRequired(); builder.Property(x => x.CreatedDate) .HasColumnName("created_date") .HasColumnType("datetime"); builder.Property(x => x.ModifiedDate) .HasColumnName("modified_date") .HasColumnType("datetime"); builder.Property(x => x.IsActive) .HasColumnName("is_active") .HasColumnType("bit"); }}或者也可以自己创建一个表ef.Customer:
CREATE TABLE `Customer` ( `id` int NOT NULL AUTO_INCREMENT, `created_date` datetime DEFAULT NULL, `customer_name` varchar(255) CHARACTER SET utf8mb4 COLLATE utf8mb4_0900_ai_ci DEFAULT NULL, `is_active` bit(1) DEFAULT NULL, `modified_date` datetime DEFAULT NULL, `payment_type` varchar(50) DEFAULT NULL, `purchased_product` varchar(100) DEFAULT NULL, PRIMARY KEY (`id`) USING BTREE)3. 实现存储层
这个层,主要用来操作数据库。
先在Startup.cs中配置数据库引用:
public class Startup{ public void ConfigureServices(IServiceCollection services) { services.AddDbContextPool<ApplicationDbContext>( options => options.UseMySql( "server=192.168.0.241;user=root;password=xxxxxx;database=ef", new MySqlServerVersion(new Version(8, 0, 21)), mysqlOptions => { mysqlOptions.CharSetBehavior(CharSetBehavior.NeverAppend); } )); }}这儿偷个懒,连接串就直接写代码里了。正式做项目时,最好写在配置文件中。
在RepositoryLayer目录中建一个DataContext,里面用来放置相关数据库会话,和操作的实例:
ApplicationDbContext.cs
public partial class ApplicationDbContext : DbContext{ public ApplicationDbContext(DbContextOptions options) : base(options) { } protected override void OnModelCreating(ModelBuilder modelBuilder) { modelBuilder.ApplyConfiguration(new CustomerMap()); base.OnModelCreating(modelBuilder); }}再建个目录RespositoryPattern,用来存放数据库操作的类。按照注入的原则,会是两个文件,一个接口定义,一个实现类:
IRepository.cs
public interface IRepository<T> where T : BaseEntity{ IEnumerable<T> GetAll(); T Get(int Id); void Insert(T entity); void Update(T entity); void Delete(T entity); void Remove(T entity); void SaveChanges();}Repository.cs
public class Repository<T> : IRepository<T> where T : BaseEntity{ private readonly ApplicationDbContext _applicationDbContext; private DbSet<T> entities; public Repository(ApplicationDbContext applicationDbContext) { _applicationDbContext = applicationDbContext; entities = _applicationDbContext.Set<T>(); } public void Delete(T entity) { if (entity == null) { throw new ArgumentNullException("entity"); } entities.Remove(entity); _applicationDbContext.SaveChanges(); } public T Get(int Id) { return entities.SingleOrDefault(c => c.Id == Id); } public IEnumerable<T> GetAll() { return entities.AsEnumerable(); } public void Insert(T entity) { if (entity == null) { throw new ArgumentNullException("entity"); } entities.Add(entity); _applicationDbContext.SaveChanges(); } public void Remove(T entity) { if (entity == null) { throw new ArgumentNullException("entity"); } entities.Remove(entity); } public void SaveChanges() { _applicationDbContext.SaveChanges(); } public void Update(T entity) { if (entity == null) { throw new ArgumentNullException("entity"); } entities.Update(entity); _applicationDbContext.SaveChanges(); }}4. 实现服务层
服务层用来实现核心的业务逻辑。同样先建一个目录CustomerService,方便注入,也是一个接口一个类:
ICustomerService.cs
public interface ICustomerService{ IEnumerable<Customer> GetAllCustomers(); Customer GetCustomer(int id); void InsertCustomer(Customer customer); void UpdateCustomer(Customer customer); void DeleteCustomer(int id);}CustomerService.cs
public class CustomerService : ICustomerService{ private IRepository<Customer> _repository; public CustomerService(IRepository<Customer> repository) { _repository = repository; } public IEnumerable<Customer> GetAllCustomers() { return _repository.GetAll(); } public Customer GetCustomer(int id) { return _repository.Get(id); } public void InsertCustomer(Customer customer) { _repository.Insert(customer); } public void UpdateCustomer(Customer customer) { _repository.Update(customer); } public void DeleteCustomer(int id) { Customer customer = GetCustomer(id); _repository.Remove(customer); _repository.SaveChanges(); }}4. 注入
这儿就是套路了,不解释。
public void ConfigureServices(IServiceCollection services){ services.AddScoped(typeof(IRepository<>), typeof(Repository<>)); services.AddTransient<ICustomerService, CustomerService>();}5. 实现控制器
重要的三层都已经实现。下面做个演示用的控制器:
CustomerController.cs
[ApiController][Route("[controller]")]public class CustomerController : ControllerBase{ private readonly ICustomerService _customerService; public CustomerController(ICustomerService customerService) { _customerService = customerService; } [HttpGet(nameof(GetCustomer))] public IActionResult GetCustomer(int id) { var result = _customerService.GetCustomer(id); if (result != null) { return Ok(result); } return BadRequest("No records found"); } [HttpGet(nameof(GetAllCustomer))] public IActionResult GetAllCustomer() { var result = _customerService.GetAllCustomers(); if (result != null) { return Ok(result); } return BadRequest("No records found"); } [HttpPost(nameof(InsertCustomer))] public IActionResult InsertCustomer(Customer customer) { _customerService.InsertCustomer(customer); return Ok("Data inserted"); } [HttpPut(nameof(UpdateCustomer))] public IActionResult UpdateCustomer(Customer customer) { _customerService.UpdateCustomer(customer); return Ok("Updation done"); } [HttpDelete(nameof(DeleteCustomer))] public IActionResult DeleteCustomer(int Id) { _customerService.DeleteCustomer(Id); return Ok("Data Deleted"); }}
代码部分全部完成。编译运行~~~
三、总结
通过上面的代码可以看到:
- 洋葱架构各层间通过接口互相关联,数据引入是在运行时进行的
- 应用以区域模型为基础
- 所有的外部依赖,如数据集准入和管理调,都是在外部处理
- 适应性强,设计也方便
总之,从应用来说,洋葱架构算是个很优秀的架构。以我的经验,在多个共同开发的项目中,具有比较大的优势。
本文的相关代码,在https://github.com/humornif/Demo-Code/tree/master/0045/demo
 | 微信公众号:老王Plus 扫描二维码,关注个人公众号,可以第一时间得到最新的个人文章和内容推送 本文版权归作者所有,转载请保留此声明和原文链接 |
原文转载:http://www.shaoqun.com/a/632683.html
败欧洲运费:https://www.ikjzd.com/w/1555
insider:https://www.ikjzd.com/w/1786
一个很清晰的架构实践,同时刨刨MySQL的坑。 一、洋葱架构简介洋葱架构出来的其实有一点年头了。大约在2017年下半年,就有相关的说法了。不过,大量的文章在于理论性的讨论,而我们今天会用一个项目来完成这个架构。 洋葱架构,有时候也被叫做整洁架构,它本身是为高质量的软件而存在的。相对其它架构而言,洋葱架构具有更好的可测试性、实用性和稳定性,并且足够灵活,完全适应项目未来可能的成长和进化。可以这么说,
pat:https://www.ikjzd.com/w/1079
卖家精灵:https://www.ikjzd.com/w/532
asiabill:https://www.ikjzd.com/w/1014
速卖通在俄罗斯推出无理由退货服务,谁来买单?:https://www.ikjzd.com/home/105766
2月份开始生效,亚马逊放宽了交付要求:https://www.ikjzd.com/home/139735
亚马逊仓库上架已成龟速,3.17之后卖家再次遭受断货暴击 :https://www.ikjzd.com/home/124040
No comments:
Post a Comment